WhatsApp is one of the most widely used communication tools, enabling millions of people to exchange messages, images, videos, and files daily. However, when it comes to professional or promotional communications, sending personalized bulk messages can be time-consuming and complex. This is where tools like WhatBot become invaluable, as they allow you to automate the process of sending personalized WhatsApp messages using variables from a CSV or Excel file.
In this article, I will provide a step-by-step guide on how to use WhatBot to send personalized WhatsApp messages. For the sake of clarity, let’s assume you want to send a reminder to customers about their insurance expiration date, including the customer’s name, car license plate number, and the insurance expiration date in the message.
1. Prepare the Excel or CSV File with Contacts and Variables
The first step is to create an Excel or CSV file containing the information needed to personalize the messages. Suppose you want to send a message that includes the customer’s name, the car’s license plate number, and the insurance expiration date. The file should contain separate columns for each parameter.
An example file structure might look like this:
| Name | Phone Number | License Plate | Insurance Expiry Date |
|---|---|---|---|
| Mario Rossi | +391234567890 | AB123CD | 15/10/2024 |
| Anna Bianchi | +391234567891 | EF456GH | 20/11/2024 |
| Luca Verdi | +391234567892 | IJ789KL | 05/12/2024 |
Tips:
- Ensure that each column is clearly labeled. The essential columns will be Name (or another identifier), Phone Number, License Plate, and Insurance Expiry Date.
- Phone numbers must be in international format (e.g., for Italy, the prefix is +39 followed by the number).
- Make sure to save the file in Excel (.xlsx) or CSV (.csv) format, as these are the formats supported by WhatBot.
- If you have a csv file be sure you have data in the following format and separated by comma:Name,Number,License,Expiry
Mario Rossi,+391234567890,AB123CD,15/10/2024
Anna Bianchi,+391234567891,EF456GH,20/11/2024
Luca Verdi,+391234567892,IJ789KL,05/12/2024
2. Install and Configure WhatBot
If you haven’t installed WhatBot on your computer yet, the first thing to do is download and install the application from the following buttons:


Once installation is complete you will see following main screen.

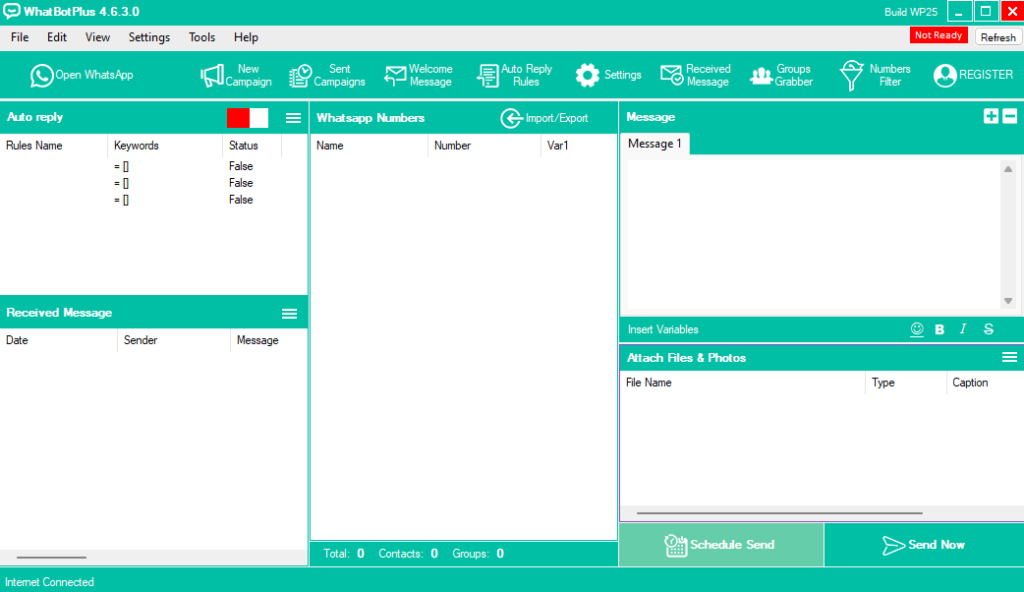
Then follow these steps to configure the application:
- Log in to your WhatsApp account: WhatBot will prompt you to link your WhatsApp account. This is typically done by scanning a QR code using the WhatsApp app on your phone.
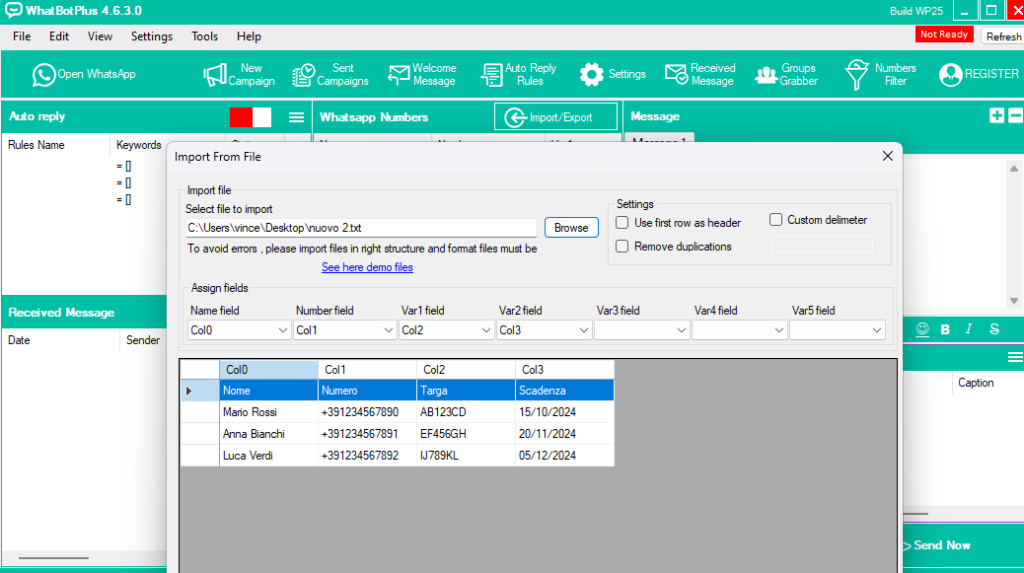
- Import the Excel or CSV file: After connecting your account, you need to import the Excel or CSV file you prepared. In the WhatBot dashboard, look for the option to upload or import contacts from an Excel or CSV file.
- Click on Import Contacts.
- Select the file from your computer and upload it.
- Make sure the fields are correctly mapped. Ensure that the “Phone Number” column is matched with the phone numbers and that fields like “Name,” “License Plate,” and “Insurance Expiry Date” are also recognized by the program.

3. Create the Personalized Message
At this point, you are ready to create your personalized message using variables from the Excel or CSV file. Let’s assume you want to send a message like this:
“Hello Mario Rossi, we would like to remind you that your car with license plate AB123CD has insurance expiring on 15/10/2024. Please contact us for renewal.”
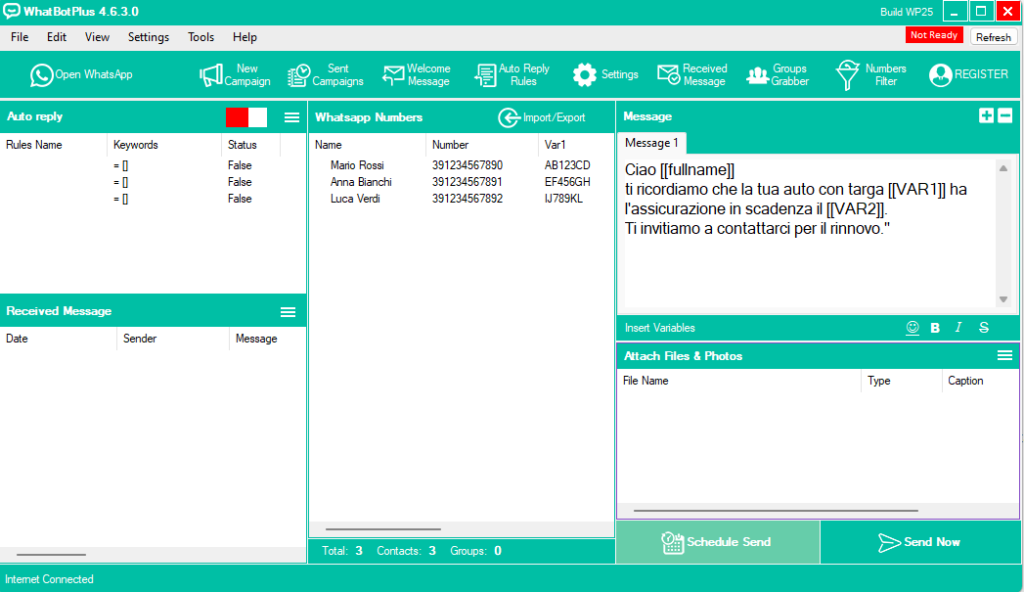
In the WhatBot message creation window, you can use variables corresponding to the column names in your imported Excel or CSV file. The message could be set up like this:
“Hello [[fullname]], we remind you that your car with license plate [[VAR1]] has insurance expiring on [[VAR2]]. We invite you to contact us for renewal.””
WhatBot will automatically replace the [[fullname]], [[VAR1]], and [[VAR2]] variables with the contact-specific data in the file.

4. Set Up the Sending Process
Once you have created the message, the next step is to set up the sending process. WhatBot offers several options for sending messages:
- Send immediately: You can send the messages right away to all the contacts in the imported file.
- Schedule the message: If you prefer to send the messages at a specific time, you can use the scheduling feature. For instance, you can schedule the message to be sent on a specific date and time, which is particularly useful when managing large-scale communications.
5. Monitor the Message Delivery
After initiating the sending process, WhatBot allows you to monitor the status of the messages. You can check which messages have been successfully sent, which were not delivered, and if there were any errors.
Benefits of Monitoring:
- You can immediately see if there were any delivery issues, such as a deactivated number or an undelivered message.
- WhatBot also lets you track replies, should you want to automatically manage customer interactions.
6. Best Practices for Sending Personalized WhatsApp Messages
When using tools like WhatBot to send bulk WhatsApp messages, it’s important to follow some best practices:
- Avoid spamming: Ensure that you only send messages to customers who have consented to receive communications from you. WhatsApp is strict about its anti-spam policies, and violating them can result in your account being suspended.
- Authentic personalization: While you are using variables to personalize the messages, be careful to craft texts that feel genuine rather than robotic. This will enhance your professional image and improve customer responses.
- Limit the frequency of messages: Avoid sending too many messages in a short period. This can annoy recipients and may result in your number being reported as spam.
Conclusion
Using WhatBot to send personalized WhatsApp messages through variables extracted from a CSV or Excel file is a powerful solution for businesses managing large customer communications. By following the steps outlined in this guide, you will be able to automate the process of sending customized messages, saving time and resources while improving the effectiveness of your customer communications.
With a personalized message that includes the customer’s name, license plate, and insurance expiration date, you can create meaningful interactions that leave a professional and helpful impression.